Learning how to do a back handspring is an exciting milestone for any gymnast. It builds confidence, agility, and forms the foundation for advanced tumbling skills. This guide covers detailed instructions, essential back handspring drills, and practical advice on how to spot a back handspring safely.

Disclaimer: Gymnastics carries an inherent level of risk. Whilst the suggested activities are proven to be effective by experienced coaches we cannot take responsibility for injuries caused when attempting to perform the skills shown. We always recommend practicing with qualified professionals in a recognized gym facility.
What Is a Back Handspring?
A back handspring is a gymnastics skill that starts with a jump backwards.
The gymnast pushes off their feet, places their hands on the floor, and flips their legs over their body to land back on their feet.
It connects other skills in tumbling routines and is often performed after a round off or before a backward somersault like back tuck or layout.
Whether you’re working on a standing back handspring or adding it into a tumbling pass, the basic mechanics are the same.
Mastering this skill builds difficulty, power and speed in your tumbling.
Prerequisites for Learning a Back Handspring
Before attempting a back handspring, make sure you have a strong foundation.
You should be confident in:
- Supporting weight on hands
- Handstand
- Dish and Arch shape and how to change from one to the other
- Back walkovers
- Bridges and bridge kick-overs
These skills build the strength, flexibility and body shaping needed for back handsprings.
Without these, attempting a back handspring increases the risk of injury and decreases the ability to perform the correct techniques.
Spend time on these before moving forward with back handspring drills.
Essential Conditioning for Back Handsprings
Strength and flexibility are key to executing a safe and successful back handspring.
Focus your conditioning on:
1. Core Strength
A strong core helps you perform the skill effeciently and with control.
Do hollow holds (dish), leg lifts, and arch lifts daily.
The body shape changes from dish to arch back to dish during the back handspring so it’s essential to build this into your conditioning.
Practice holding a handstand and shifting between a tight arch into a dish (hollow) by changing the shape in your chest and shoulders. You may need a spot or a wall to help you hold the handstand whilst doing this.
If you are not ready to do the dish arch shape change in a handstand then it can be practiced on the floor by laying flat on either your front or back.
2. Shoulder Flexibility and Strength
Practice shoulder stretches against a wall.
Strengthen your shoulders with handstand shoulder shrugs, bridges and resistance band work.
You don’t need super flexible shoulders to do a back handspring (in fact it can be harder if you are really open in your shoulders but have little strength). You just need shoulders that can open enough to hold a strong arched handstand. The arch should happen through the shoulders and chest and not the lower back.
3. Leg Power
Back handsprings require explosive leg push.
Do squats, box jumps, and calf raises to increase take-off strength.
Back Handspring Drills and Progressions
These back handspring drills build technique, strength, and muscle memory.
Use them regularly to develop good habits. These drills are listed in no particular order.
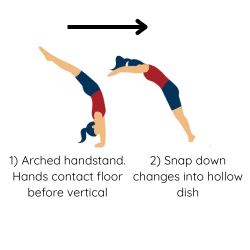
Drill 1: Snap-Downs
From arched Handstand snap your legs down hard into the floor. The arch to dish shape change occurs through the snap down.
This builds rebound power for connected tumbling passes.
Drill 2: Jump Back To Dish
From a standing position, set your back handspring by squatting and falling back off balance.
At point of being off balance jump backwards and land on your back on a mat approximatley thigh height. Land in a hollow dish shape.
This helps get the timing and shaping of the take off for a standing back handspring.
Drill 3: Bridge Kick-Overs
Start in a bridge, then kick over into a standing position.
This improves shoulder flexibility and confidence in going inverted (upside down).
Drill 4: Sitting Shapes
Sit in Pike shape, lower your chest forwards like a pike fold (don’t worry if you don’t fold completely).
Lean back and reach your arms over your head until you lay flat on your back. Change into a tight arched shape. Only your feet and arms should contact the floor. This step replicates the reach back and passing through handstand.
Lastly change into a hollow dish. This last step represents the snap down.
These drill increases body tension through the shapes.
How to Do a Back Handspring Step-by-Step
Here is a breakdown of how to do a back handspring from start to finish.
This step-by-step method helps you focus on each phase of the skill.
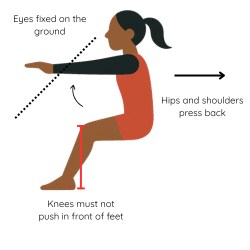
Step 1: Starting Position
Stand with feet together. Eyes focussed on the floor about two or three feet in front of your feet.
Arms start pressed down towards your thighs.
Bend your knees and hips ensuring your knees do not go forward past your feet. Keep you shoulders down and round (hollow shape).
Step 2: The Swing
Start to fall backwards off balance.
Drive your arms up and back as your shoulders and hips press back.
Keep pressing your toes into the floor.
Step 3: The Jump
Jump backward.
Push through your toes while driving your hips up.
Your arms swing back up quickly and stay by your ears.
Do not throw your head back.
Keep eyes looking at the floor for as long as possible.
As your feet leave the floor extend your legs.
Step 4: Reaching for the Floor
Your body begins to rotate as your hips push up towards handstand.
Lift the head slightly to spot the floor.
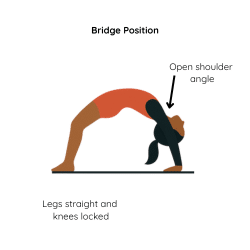
Keep shoulder angle open like you would for a bridge.
Your hands should touch the floor before your legs pass through the handstand (vertical).
Step 5: Hand Placement and push
Place your hands shoulder-width apart on the floor.
Your body should be tight in a slight arch shape.
As you push away from the floor close the shoulder angle slighlty and pull the chest into hollow dish. Lift your chest at the same time.
Keep eyes fixed on the floor.
Step 6: Leg Drive and Snap Down
As your hands push off the floor, drive your legs over.
Snap your feet down quickly to the ground aiming for them to land in front of your hips.
Some gymnasts slightly pike during the snap down as it increases power. If you attempt this you will need to push the hips forward before your feet hit the floor.
You are almost aiming to have your feet snap to where your hands were on the floor. This will create backward momentum suitable for linking another back handspring. However if you are planning on adding a back tuck your feet should contact the floor behind your hips so create a shorter snap down.
Control your shoulders as you snap into the floor.
Common Mistakes and How to Fix Them
Many gymnasts struggle when learning how to do a back handspring.
Here are common errors and how to correct them.
Mistake: Throwing the head back
This can also cause your knees to move too far forward over your feet on the take off.
Fix: Keep your head neutral.
Look down and forward as you take off.
Mistake: Bending arms on the floor
Fix: Lock out your elbows to stay safe and keep control.
Build in more upper body strength work to your conditioning.
Mistake: Not jumping back far enough or too high
Fix: Practice jumps backward on a mat to build confidence and distance.
More leg strength work in your conditioning.
Mistake: Legs bent or too far apart as you pass through vertical
Fix: If you have a coach who can spot you, practice the first half of the back handspring only and stop in vertical handstand. Correct leg shape. A barrel or flick trainer is great for slowing the back handspring down and correcting leg shape.
How to Spot a Back Handspring
Knowing how to spot a back handspring correctly is critical for safety and learning.
You should only attempt to spot a back handspring if you are qualified to do so or are under supervision from a more senior coach.
Spotting helps the gymnast stay safe while building confidence in the skill.
Here’s how to spot for a back handspring:
- Stand slightly behind and to the side of the gymnast.
- Support under the lower back with one hand and under the thighs with the other.
- As the gymnast jumps back, one hand supports the weight though the upper body whilst the other helps the legs rotate over the head.
- Stay alongside the gymnast until they have controlled the landing.
Spotters should avoid causing an over arch in the back or holding behind the knees as this will cause the gymnast to bend their knees.
With more advanced gymnasts a good spotter will encourage the gymnast to travel further in the first half of the back handspring by exageratting the jump.
Some elite coaches vary the hand placement in the support. Having one hand higher up the back allows the spotter to place a couple of fingers behind the head and prevent the head being thrown back.
Its also possible to have one hand lower and placed behind the calf muscles of the leg. This encourages the jump and rotation more.
These more advanced spotting techniques should only be used under supervision and with confident gymnasts.
Never coach outside of your qualifications.
How to Do a Back Handspring at Home
Doing a back handspring at home can be dangerous if you’re not ready.
You should only attempt back handspring drills at home once you’re comfortable with the basics.
Here are safe ways to train at home:
- Practice jumps on a soft mat
- Do handstand snap-downs against a wall
- Strengthen your core and legs with bodyweight exercises
- Use a back handspring trainer (a barrel or wedge mat)
Avoid full back handsprings at home unless a trained adult is present to spot you.
Back Handspring Step-Out
A backhandspring step out is a variation often used in beam routines.
Instead of landing with feet together, the gymnast lands one foot at a time.
It looks more graceful and allows smoother transitions.
Here’s how to do a backhandspring step out:
- Start like a normal back handspring.
- During the flip, split your legs in the air slightly.
- Land one foot first, then the other.
This version takes more coordination and body awareness.
Mental Tips for Back Handspring Progress
Learning how to do a back handspring is as much mental as it is physical.
Fear is a common obstacle for beginners.
Many gymnasts struggle to commit to jumping backward.
Here are mental tips to help you overcome fear and make progress:
1. Visualise the Skill
Before you practice, close your eyes and picture yourself doing the back handspring correctly.
Imagine every step of the motion.
See yourself landing safely and confidently.
2. Use Positive Self-Talk
Tell yourself, “I can do this,” or “I’ve trained for this.”
Replace doubt with focus.
Confidence grows with repetition and encouragement.
3. Start Small and Build Up
Don’t force yourself to do the full skill right away.
Break the movement down into smaller back handspring drills.
Celebrate small wins like improved hand placement or cleaner landings.
4. Trust the Spotter
When learning how to do a back handspring, a good spotter makes all the difference.
Trust their guidance and support.
It helps you commit fully to the motion.
5. Keep Practicing
Confidence grows with consistency.
Do back handspring drills regularly.
Repeat movements until they feel natural.
Fear fades when skill and trust increase. We’ve put together a list of the best gymnastics quotes to help motivate you and push you through the challenges of mastering a back handspring.
Equipment That Helps You Learn a Back Handspring
Using the right equipment can help you learn how to do a back handspring safely and more effectively.
Here are useful tools for back handspring practice:
1. Wedge Mat (Incline Mat)
This angled mat helps reduce fear by making the motion easier.
It simulates the slope needed for rotation and builds confidence.
2. Back Handspring Trainer (Barrel)
These padded shapes support your back and help you rotate safely.
They are ideal for beginners working on back handspring form.
3. Spotting Belt
This harness system allows coaches to lift and guide you safely during the skill.
It builds confidence and helps you commit to the motion.
4. Soft Floor or Air Track
Extra cushioning reduces impact and builds safety.
Soft floors are perfect for practicing back handspring drills at home.
5. Wall or Stall Bars
Great for shoulder stretches and handstand practice.
They help build the flexibility needed for the skill.
What Age Can You Learn a Back Handspring?
Many parents and gymnasts ask what age is right to learn how to do a back handspring.
There is no exact age.
But here are general guidelines:
- Most gymnasts start learning around 6 to 8 years old.
- It depends on strength, coordination, and prior skill development.
- Younger gymnasts may begin with basic drills and spotting.
The key is not age—but readiness.
Before learning a back handspring, gymnasts should:
- Hold a solid handstand
- Kick over from a bridge
- Show strong core and leg control
- Understand basic tumbling safety
If your child is consistent in gymnastics class and eager to learn, they may be ready.
Always train under qualified supervision.
How to Know You’re Ready to Do a Back Handspring
Here are signs that you’re ready to learn how to do a back handspring:
- You can do a back walkover on your own
- Your handstands are straight and strong
- Your dish and arch shapes ashow good body tension
- You feel comfortable jumping backwards onto a mat
- A coach has approved your progress
Don’t rush the process.
Trying the skill too early can lead to injury or fear.
Progress step by step using drills and proper support.
Advanced Back Handspring Progressions
Once you’ve mastered the basic standing back handspring, there are several ways to challenge yourself further.
1. Connected Tumbling Passes
Add the back handspring after a round-off or into a back tuck.
This builds power and connection.
2. Multiple Back Handsprings
Link two or more back handsprings together.
Focus on tight form and strong snap-downs.
3. Back Handspring to Back Tuck
Combine your back handspring with a backflip.
This skill requires strong rebound and core control.
4. Back Handspring on Beam
A narrow surface makes this skill much harder.
Use mats and spotters during early practice.
This progression is only for experienced gymnasts.
Key Takeaways for Learning How to Do a Back Handspring
Here’s a quick summary of everything covered in this guide to help you learn how to do a back handspring successfully:
- Build a foundation with handstands, bridges, and round-offs
- Condition your core, legs, and shoulders
- Use drills to develop timing and strength
- Practice with proper equipment and safety measures
- Always work with a trained coach or spotter
- Start with supported drills, progress to standing back handsprings
- Use mental tools to overcome fear and boost confidence
- Train consistently and stay patient
Final Thoughts on How to Do Back Handsprings
Learning how to do a back handspring takes time, strength, and proper technique.
It’s not a skill you can rush.
Use every tool available—coaches, equipment, and focused practice—to build your ability step by step.
Stay consistent with your back handspring drills, focus on safety, and celebrate your progress.
Whether you’re training at home or in the gym, commit to learning with patience and confidence.
The more you practice and trust the process, the better your back handspring will become.
If you want to learn a back handspring with a qualified coach enrol for a free trial session here at Synergy!
FAQs
What age is best to learn how to do a back handspring?
Most gymnasts start learning how to do a back handspring between ages 6 and 12, as flexibility and strength develop significantly in this range. However, older learners can also succeed by following proper back handspring drills and receiving consistent spotting from qualified coaches.
Is it safe to practice back handspring drills at home?
Practicing back handspring drills at home is safe only if performed correctly with proper mats and supervision. Always have someone trained on how to spot a back handspring present, and start with simple strength and flexibility exercises to build confidence and minimize injury risk.
What muscles does a standing back handspring work?
A standing back handspring primarily engages your shoulders, arms, core muscles, legs, and back. Strengthening these muscle groups through targeted back handspring drills helps increase stability and power, allowing gymnasts to perform the skill safely, efficiently, and with greater control.
How long does it typically take to learn how to do back handsprings?
Learning how to do back handsprings can take from a few weeks to several months, depending on your current fitness level, flexibility, practice frequency, and access to coaching. Regular practice of specific back handspring drills and proper spotting accelerates this learning process significantly.
What’s the difference between a back handspring and a back handspring step out?
A regular back handspring involves landing on both feet simultaneously. In contrast, a back handspring step out means landing sequentially—first one foot, then the other. Gymnasts commonly use a back handspring step out to smoothly connect to additional tumbling skills or routines.
- How to Do a Back Handspring: Complete Step-by-Step Guide
 Learning how to do a back handspring is an exciting milestone for any gymnast. It builds confidence, agility, and forms the foundation for advanced tumbling… Read more: How to Do a Back Handspring: Complete Step-by-Step Guide
 - How To Get Over a Mental Block In Gymnastics: A Complete GuideGymnastics is a sport that requires not only physical strength and skill but also mental strength. When a gymnast feels like they cannot attempt a… Read more: How To Get Over a Mental Block In Gymnastics: A Complete Guide
- The Best Leotard for Girls in 2025: What to Look ForFinding an ideal leotard for girls isn’t just about picking a dazzling design that sparkles (although it does help!). The leotard has to fit perfectly,… Read more: The Best Leotard for Girls in 2025: What to Look For
- The Best Gymnastics Shorts (Our Top Picks)The best gymnastics shorts are designed to be worn over the top of a leotard providing additional coverage around the upper legs, whilst allowing gymnasts… Read more: The Best Gymnastics Shorts (Our Top Picks)
- Decathlon Leotards – Are They Any Good?
 If you’re in the market for a new leotard, you may be wondering if Decathlon leotards are any good considering the low cost of their… Read more: Decathlon Leotards – Are They Any Good?
 - A Complete Guide to Gymnastics Hand RipsAre you tired of dealing with painful gymnastics rips on your hands from training? Look no further – this article offers a comprehensive approach to… Read more: A Complete Guide to Gymnastics Hand Rips